Saturday, September 1, 2012

Other People's Teals.....

So, today I went out to Frenchtown Pond with the Pica and met up with James with the Blue Flower.  You don't really see much mention of Teal's really showing up in groups, but sometimes they do.

This time around we were looking at a lot of wind, with gusts up to 19 knots.  Not much in the grander scheme of things, but for Missoula it is an exceptional amount of air on the move.  James was already in the water with his gaff rig with jib(somewhere in the neighborhood of 65 sq ft); myself, I tied my reef in on my balanced lug (45 sq ft).  If a good gust presented itself, I could boogey quite well.  I might have run up the whole sail (67 sq. ft.) but I wasn't feeling too ambitious--not to mention that I still need to deal with the fact that my mast is a "hair" to short for the sail I have (bought on closeout from Polysail) http://www.polysail.com/

An excellent comparison of sail plans of the Pica (left) and Blue Flower (former Annas Discors) on the right.  Don't let that gaff rig fool you.
So, my sailing was rather lackluster, but it was fun, and I may well dropped the reef and gone all out, but my tiller extension gave up the ghost (broken screw eye), leaving me to drop the rig and row to the dock.  Phooey!

James came in at this point and suggested lunch, which struck me as a good idea. At lunch he complained about a problem his rig has always given him in heavy winds.  To wit: the problem would be that the boom would furl up against the mast in heavy wind.  He had such an event before I arrived, and had the hole in his main sail to prove it.   He knew he wanted a downhaul but, rather like me, hadn't gotten around to mounting it yet.  Still, he has fun with his boats and you can read about that here:  http://inlandpacket.blogspot.com/

Well, that's what rope is for.  Happily there was an eyelet in one location and sufficient projections on the mast in the other.  Not much later a boom vang in born.  Now oddly enough, James was generous enough (?) to suggest that I take the boat out.   He said the Blue Flower is touchy and edgy with the wind--well he was right.

I guess the first harbinger that this would be interesting was after I had cast off the dock  "You know, I always put up the sail at the dock........"  In all honesty, I found that rather lame, I always thought a person should be able to raise and strike a rig on the water.  I did get the sail up, but a person does need two ropes (throat and peak halyards) and the parrel beads merrily hung up on the bolts on the tabernacle.  With sail up, twas time to sail.

Now, a balanced lugsail is simple:  one sheet, one halyard, one sheet line.  The Blue Flower is not:  Two halyards for the Gaff.  A line for the boomed gaff, a halyard for the gaff and a downhaul for the jib.  Yeah, five lines to sail a boat... egad.  Now in light airs this would be a non-issue, as very little of it would require fiddling, not so today.

Once I got away from the dock, which typically has weak winds, I was moving along nicely.  I did not raise the jib but the wind was moving the Blue Flower along nicely.  I decided to test out the boom vang by trying the one maneuver that gave James such trouble--a straight downwind run.  I was not able to get the boom to pop up, though I knew it was going to rise up some, simply because I had no way to really apply tension to the vang.  The gaff sail pulled well enough, and I soon had the boat up to hull speed and a wake that looked like I had a motor.

It took a while to master how to tack with the rig, and in the process of doing that I had to "go around" on a tack, which brought me too close to shore, in a tight turn and with the wind on my stern quarter, over she went and well, blub blub.  Happily I was close to shore and able to get the boat ashore.  Also the air boxes on the Blue Flower seem to work better than mine on the Pica, so the boat took on less water.  After much happy bailing (with James watching after dealing with the Pica as a rowboat) I set out again, this time with the jib up, but the gaff scandalized.

I would not scandalize the rig next time as it did not seem to provide a great advantage and it hampered performance later on.   I  spent about another half hour tooling around the lake, crashing through shoals (fallen trees) and pushing the heeling limits of the Blue Flower without actually sinking it again.  Finally I made it back to the dock and gleaned a few things:

A stiff rudder is kind of handy.  Since the Blue Flower has cockpit coaming, tacks are easy (1) put the tiller over the coaming and let the boat come around (2) when the boat is almost through the tack, shift yourself across the seat thwart (3) take in the sheet to keep loose lines from causing trouble (4) pick up the tiller and let out the sheet once on the new heading.  After practicing, it get a whole lot easier.

The Blue Flower is a very sensitive boat.  Part of this is because you are seated on a thwart that is 6 inches off the floor.  The coaming also makes it hard to get out on the rail.  being 240 pounds is a benefit for that, but not everybody comes with built in ballast.

A great example of the "barn door" rudder on the Pica.  Contrast this to the low aspect rudder on the Blue Flower below.

 The rudder on the Blue Flower is light years different from the catboat style barn door on the Pica.  It certainly helps the Blue Flower have a healthy weather helm, but gaining steerage way is a bit of a challenge and between that and the wind direction (no wind pennant) led to a number of gybing turns to make a tack.  I did get better at it and that gives me reason to think that I might be wise to try a different rudder blade setup on the Pica.

So, all in all, a very rewarding day on the water.

Boom and Bust

Had the Pica out on Frenchtown Pond a couple weeks ago (perhaps I should post more promptly?) and the wind was very good.  Sadly is was winging out of the northeast, which creates weird wind shadow problems.  It was also gusty and fickle, which amplify sail shape problems

Problems?  Well, actually, when all is working well, the balanced lug I have on my Bolger Teal works great.  However, due to some construction shortcuts (no....) I have been bothered by my sails sometimes, and the most recent sail pointed this out in spades.  The main point of the problem is the outhauls slipping and causing the lead edge of the sail to bag, which makes the sail much more difficult to control when trying to point into the wind.

Just a note to indicate that outhauls provide tension to the top and bottom edges of a sail, and downhauls provide vertical tension against the halyard (in very general terms).   A great discussion of rigging a balanced lug, especially for performance, can be found in this article by Mik Storer at:  http://www.storerboatplans.com/GIS/GISRigging.html

Why would the outhauls slip?  Possibly because they are wrapped and tied around the end of the boom and yard with no cleats or eyelets or anything to hold them in a particular position, save friction.  If the knots remain undisturbed, things are great, but if something gets loose....look out!  Obviously if I had built the Pica to the stock plan, the leg of mutton sail detailed by Phil Bolger would have no outhauls and darned little fiddly rigging to hassle with.

Of course the Leg of Mutton (Spritsail) cannot be reefed either, and that seems like a bad idea if weather conditions can vary as much as they can locally. 

So, maybe it's time to deal with those slipping outhauls and wandering rigging by putting some cleats on the upper boom.  The lower boom gets by with a couple screw eyes to restrain the lines, though that should be upgraded somewhere down the road.   So the simple solution is to run down to the nearest chandler (brick and mortar or online) and pick up the required cleats.  Being a more frugal (cheap) sort, I elected to make them out of wood.  I've have other wooden cleats on the boat, so why not more?

At this point I can't point out photos of these beautiful little gems.  Okay, that might be pushing it, but I did make a pair of regular cleats for the outhauls on the upper boom, and a thumb cleat to limit the movement of the halyard.  Subsequent sailing has shown the problem to be remedied.  I'm posting this blog without pictures because I have another post to put up (and don't want to get all out of order).  However I will put up pictures shortly.

Sunday, May 13, 2012

A Turning Point, the evolving rudder...

Who would have thought that sinking my boat would take the wind out of my blogging sails?  Egads.  The story is not over (not by a long shot.  I won't steer you wrong--in fact lets talk about steering!

When this boat was abuilding I don't really recall what Payson mentioned about rudder hardware. One thing though, there's darned little out there designed for a double ended (and pointy ended at that) sailboat.  It gets a little better when you have a real stem and stern (as exposed timbers--but those timbers are buried under plywood, so some sort of canoe rudder hardware is required.

Being cheap and not really seeing anything cheap and easy to procure, the first thought was:  why not make them out of wood.  Yes!  Wood gudgeons and wood pintles!  It is a wood boat after all, no?

Somewhere around this time, I had come across the Wooden Boat Forum, and in there, lots and lots and lots of photos of James McMullen's Rowan, an Ian Oughtred design called the Sooty Tern.  It certainly wasn't the boat I was going to build (being 19'--certainly not), but there were plenty of photos of construction details, including the rudder.  Well, the Rowan had nice cast bronze hardware, which I wasn't thinking I could replicate.  Still, good design is always an inspiration, and the idea of having flowing carved gudgeons in dark wood as brightwork against a white hull still strikes me as something really cool to attempt--with a proper bandsaw and sanders........  Lacking that certainly changed the outcome.


Wait though.  Wasn't the  Annas Discorse equipped with a rudder?  Of course, but the Annas Discorse also has a transom, a narrow one, but a transom just the same, and so was able to use much more common gudgeons for a flat surface.  A picture here will explain neatly:

From the Annas Discorse--note the transom end of the boat--not pointy.
 So, what resulted is sort of brute force gudgeons.  The pintles would probably qualify as brute force trauma--and the two were connected by dowels made from cut down broom handles.  Did it work?  Well... sort of ....   note the sort here.  A picture might be more interesting....

Even at this early point, this I think is the second time out, the wooden pintles were regarded as failures and replaced with "Payson Eyes" (large screw eyes).  The pins are dowels, with copper wire keepers.      


The wooden pintles just didn't work, the non-square pivoting of a sharpie end caused them to bind and frankly, they were really bulky and ugly--that blunt force trauma thing.  They were replaced with "Payson eyes", (ie, screw eyes).  They performed better, so long as the pins didn't get lost.  The gudgeons actually functioned quite well, for being sort of whacked out of tight grained 2 x 4 stock.  They stayed with the boat even after it was painted.  The misshapen rudder stock was ok, but rudder failures kept cropping up, and that takes all the fun out of going out on the water.  Time for a new plan....

Wooden Boat Magazine has a wonderful forum that is full of all sorts of interesting stuff. Even though the bulk of it is aimed toward traditional construction methods and larger boats, good design ideas and sound construction techniques are everywhere.   One of the threads I was reading involved rudders, and one photo (getting permission for it) posted by "Thorne" gave me a straightforward solution to making a decent pop up rudder.  Rather than having the blade of the rudder fit within the rudder stock "cheeks" why not have smaller cheeks that pivot with the rudder blade?  A picture of what I built:

  
Simpler, easier and, as a bonus, more effective!

Showing the rudder head, and the tiller extension.  Of course later it was suggested to have the tiller on the other side, which is where it still resides, though changing it (or breaking it down for storage, is simply a matter of pulling the pin and switching it.
The new design required changing to a push pull tiller, but that was ok, as I was tired of having the tiller handle sticking me in the back, and having to reach around to work it while sitting in the middle of the boat.  The rudder blade was recycled, but rather than use a rope tie down to keep it down, I decided to weight it with lead--handy when one has a hot metal pot built into an Intertype machine.....

So... what did I do about the pintles and gudgeons?  Will, I got lucky to find a set of stainless canoe gudgeons on Ebay, and later wound up buying pintles from Duckworks.  Of course the two didn't mate, as the gudgeon pins were too big, but I had access to a lathe and did machine them down, yielding a much handier setup.  It certainly took time to get used to the new tiller setup, and some really exciting gybes were the result, but I consider the new rudder a success, and it will likely remain with the boat for as long as it sails. 

Next time around, perhaps a look at the sails is in order, or the mast, it'll be one or the other.

Saturday, July 9, 2011

When Things Go South

In many ways the construction of my boat is nearing the end--though there is plenty more to share here.  Still, even with the boat built, there's much more to be learned...sometimes in ways that I'd rather not.

One of the goals of the plan drift that I imposed on the Teal was to make it easier to recover from the inevitable capsize.  All boats can capsize, just that some are much easier than others.  The Teal is considered a fairly "tender" design, which means that it will let you know the wind is at it and, if you ignore that, let all the water from the outside in.  Blub, blub.

Well, while I was able to do some sailing this year, singlehanding was being strangely elusive (people seem to like riding in my boat).  Today (yes, a column written the day of the event!) the wind forecast looked good, with winds running about 10-15 mph and temps in the low 80's, pretty much gorgeous.  So, with the help of my son, I loaded up the boat and went out to Frenchtown Pond State Park.

There were a lot of people at the park, and I was using my old sail. which I has partially unrigged.  I launched after putting things together, navigated around all the kids crowding the dock and got far enough out to run up the sail.   About that time I realized I hadn't rigged things precisely correctly, so some fumbling about resolved that problem and I was off.

Frenchtown Pond is small, a measely 52 acre gravel pit that flooded.  In some ways that's a good thing, as it makes you have to think about your sailing, and also practice tacking, a lot.  The wind was blowing strong out of the northwest (it seemed and I could put on great bursts of speed.  I've modified my rudder steering from a tiller to a push tiller and I still need to get comfortable with the arrangement.  Still, was going good and got up to the far end of the pond when I was about to go on a reach across the pond and go around a fishing skiff that was at that end before a wonderful broad reach down the length of the pond (about a 1/2 mile).

Well, I must have gotten greedy and sheeted too much, because I caught a gust square on and before I know it, I am taking on water and pretty much sank!  Karma, I suppose.  Happily the water was warm.  Also good is that nobody was there to take pictures!  Even better was that the fisherman and his son were willing to render aid to help me get my Pica to shore.

In the course of this, I learned a lot of interesting details that will be applied in the future:

An ill fitted life-jacket is nearly useless to swim in.  It doesn't sound like much fun, but the darned things have to be near strait jacket tight to keep them from riding up or snagging lines.

Speaking of lines, since I went over on the lee side, I wound up getting tangled with my mainsheet, and it was somewhat disconcerting to get out of it, as some of the lines were getting up under my life jacket.  It made me understand why the old timers would carry a knife on them to cut themselves free.  Happily I didn't need to exercise such an option.

One thing I did right though--I did not panic.  Happily, neither did my son, who was watching from the shore and came over to where I was able to beach the boat.  Unhappily I must remind myself that I might have been better to abandon ship and not try to resolve it right there right then.

While I could right the boat with the mast and rig in place, each time I did so, the vessel was completely swamped.  I did release the halyard to bundle the sail, but this yielded no useful results.  It didn't help that the decks over the future airboxes were not watertight yet, so they flooded.  Next time (oh yes, there will be a next time) I'll have to see how the boat rescues if the mast is removed, as the boat did actually sit high on its side and without the mast may well have come out much drier.

Figuring out how to rescue the boat without it being awash would be nice in another way:  after I brought it to shore, it took a long time to bail the fooled thing out.  Perhaps I need a bigger (than l gallon) bailing bucket.  Needless to say, once I got it bailed out, I rowed back to the dock to pull out.  I didn't feel like trying my luck again--at least not til those air boxes are tight.

The Great Voyage--Part One

Let's go back in time, to marvel that it sure seems a lot longer than a year (and not even that) that I've had my boat.  So, to late September James and I went to Frenchtown Pond to fiddle about.  Wind was good but one of the rudder pins got loose and so we had to put back to port and call it good.  The intent, the next day, was to go to Finley Point State Park on the FIathead and see what would happen up there.  The rudder was repaired before setting out, of course.

So the next day, things are loaded up and off we go.  It's a beautiful indian summer day and in reasonable order we make it up to Finley Point.  While about to take the boat off the carp top, it came to notice that the leeboard was nowhere to be found.  What?  How can one mislay a leeboard--especially off a Teal (which is a 15" x 4 foot chunk of plywood)?


So, I indulge in the captains first prerogorative:  Blame the crew!  Suffice it to say, the crew denied any responsibility for the failure of items to be recovered (leeboard being left on the lawn where we loaded the boat at Frenchtown Pond.

This turned into a round and round debate and a question of what responsibilities does the crew have.  Of course the buck stops with the captain but if you intend to be on a vessel, I would say you should do whatever you can to ease the journey.   Rather like arguing angels on the head of a pin.

Some degree of hard feelings were running along, and since we were 60 miles from Missoula, there wasn't much to be done.   "Well, we could go out anyways", said James.   Ummmm, yea we could.  The lake was fairly calm and the wind was from the north at 5 mph at best.  At least we could see what happens, since we are here, and we have oars.  "Okay, we can try that," I said "What could go wrong?"

With that we set up the rig, loaded ourselves, lunch and a tool kit (duct tape and bailing wire, among other things), and finally rowed out of the marina and out into the lake.
Looking north from Polson Bay, past Finley Point (the Narrows) and into the main portion of Flathead Lake (look Ma! No Horizon!).  Finley Point is to the right, Little Bull Island at center, an unnamed isle next to it and Big Bull at the left.  Weather conditions this day are excellent.  The Flathead is a nifty inland sea.

The sail was run up and we seemed to make good progress from shore.  Winds were from the north at maybe 5 mph.  With two grown men in a Bolger Teal (load of probably 450 lbs) well, we weren't making great time, not at all.  "You know--if we jury rigged a leeboard, we might make better time..........."

Not sure whose idea this was, but it seemed like a good idea--at the time.  Well, there was a clamp, bungee straps and rope to be had... why not?  The work began in earnest.

Jury rig complete.   Yes, a real leeboard would be much more logical.

Somewhere toward the end of fiddling and getting this oar set up as a leeboard, I looked about and asked:
"Where's the other oar?"   Somewhere, in whatever we were doing, the other oar had jumped ship and drifted lazily off behind us--never to be found.  Hope somebody found it on the shore and got some use out of it.   The only saving grace was that it was the oar with a knot in it--but the prospect of having to make another oar was not helping my cheerfulness index--no, not really.  Good thing James knows lots of martial arts stuff and that it's really impractical to have physical combat in a 12 foot boat, well, I think it is anyway.  Suffice it to say, we got along well enough to continue--after all, where are ya going to go?

We were hoping we could tack and get towards Little Bull Island--the nearest one to Finley Point State Park.  Well a Teal with two guys in it is really a pig for what we wanted to do.  As we kept going, the wind finally dropped out with us roughly south-southeast of Big Bull.  We could make out the dock and boats belonging to the UM Biological station there.  We however, were a good quarter mile offshore, and not getting one foot closer to either island, as the wind seemed to desert us.

Still, it was a pretty day.

Looking southeast into Polson Bay.  The Mission Mountains march off in the haze.  Polson would be six miles distant on the right side of the photo.  By this point, we were making out way back.
We sat becalmed out in the middle, off of Big Bull for what seemed a while, but probably wasn't more than 20 minutes.  James, being one who reads lots and lots of nautical books and such, threw some bread crumbs on the water and lo! we were moving--albeit slowly.  He then made up a chip log to watch our pace, which wasn't blistering at all.  Part of the problem was that the jury rigged oar would turn enough to be a drag and keep us from moving much of anywhere.  Some adjustments later, we were on our way---slowly.

We finally did make our way back to shore and got back to Missoula.  I was able to retrieve my errant leeboard from the Fish Wildlife and Parks office, who informed me that some kids were using it as a skateboard ramp!  Well, all's well that ends well, and any voyage that brings you back to dry land is a good one!

Saturday, April 23, 2011

A Little Paint......

   Well, Spring is finally sort of making an appearance.  The sun came out and temperatures finally creeped above the 40's.  Gee, it's almost May and the tulips haven't even bloomed yet!
  
   A couple days ago I finally pulled the tarp off the Pica and moved it over to the sawhorses/workbench.  There I realized I rather botched the "long winter's sleep department".

It wasn't really nice to look inside the boat and see this nice blush of mildew.  Curiously it didn't take on the floor or the bottom of the sides, on account of epoxy coatings there.
    Mildew, sure sign that I really didn't have the boat blocked off the ground well enough and moisture built up under the hull (upside down).  I will have to build higher bunks for next winter--as I suspect that this will happen whether the interior is painted or not.

    On the outside, more things pointing out that better storage is needed:

This is the view of the outside of the hull, and while the mildew is not as bad as the interior, there is still some checking and varnish failure.  Blue tarps just aren't that good.

  So... what to do?  Sadly, the mildew appeared the bloom under the varnish.  It also seemed to be the worst on the luan and somewhat on the plywood bulkheads.   Solid wood pieces were not affected, but that may be because there was either more varnish applied (varnish early and often--like voting).  It could also be that the plywood products did not present as tight a surface and so the varnish that was applied, just wasn't enough to fill the pores.   To note, the gunwales came through the winter in perfect condition.

  Not really sure what the mildew would do, or not do, but I wasn't too worried about the outside of the hull, as it was meant to be painted anyway.  To that end, I did some sanding the then painted it Rustoleum Topside Marine Paint.  Yeah, Rustoleum makes boat paint--with one caveat:  the paint is not meant to be submerged for long periods of time (over a week).  I don't think I'll have that problem, so I started by putting down a coat of primer.


   What a difference a coat of paint makes!   I didn't quite get it perfect (runs on one side) but those will sand out and I'm pretty confident I can make the finish coat look good.  Still not sure what to do with the interior as yet.   Much as I really want to get out onto the water, I really ought to get this done first.


Wednesday, January 12, 2011

It's a SAIL boat--

Well, some folks have the power of denying themselves gratification, but I'm just not that disciplined.  With the bull together, oars in hand and a mast raised, it wasn't much more to cut the sail and booms, figure something of the rigging and have that in order.  The leeboard and rudder--well they deserve their own stories (oh boy....).  Suffice it to say, time to take the boat out.

Frenchtown Pond State Park is a 52 acre flooded gravel pit, but is long enough and broad enough to make some decent sailing.  It's also the closest water to get to.  So, putting the boat on the car and trundling out with James (who brought his current 1 sheet skiff project, the Trudy C.) the challenge lay ahead, will it float? So, August 26 was the fateful day, and worked out to be a pretty good one.

Fiddling with the lines and not ready to sail anywhere, but it does float!
There was a decent breeze (anything around here rates as wind), and when I finally got the lines in order and the leeboard set--off I went!   As much as people complain that the Teal design is tender, I didn't find it that bad--certainly a whole lot more boat than a Harley 8!

And now we're sailing.  Oh so short lived--shallows ahead will not play well with the leeboard.
At the Pond, it's always into the wind to go west, and a true test of what a boat will do if you can get past the dock.  The Pica did that with ease and, as a bonus, tacked without stalling.  To say the least, it performs great.  There are no doubt boats that run rings around a Teal, but for starters this was pretty darned good.  Sadly, in not being mindful of lake conditions, and having made a really big leeboard, I eventually found that getting near the shore created problems.   After running the leeboard aground once, I was able to sail a bit more before it decided to fail when on a reach.  Even so, I was able to sail back to the dock.   Actually this was the first of many excursions, but one of only two with decent wind.  Well, lets me work on my rowing skills.

Ready Oar Not

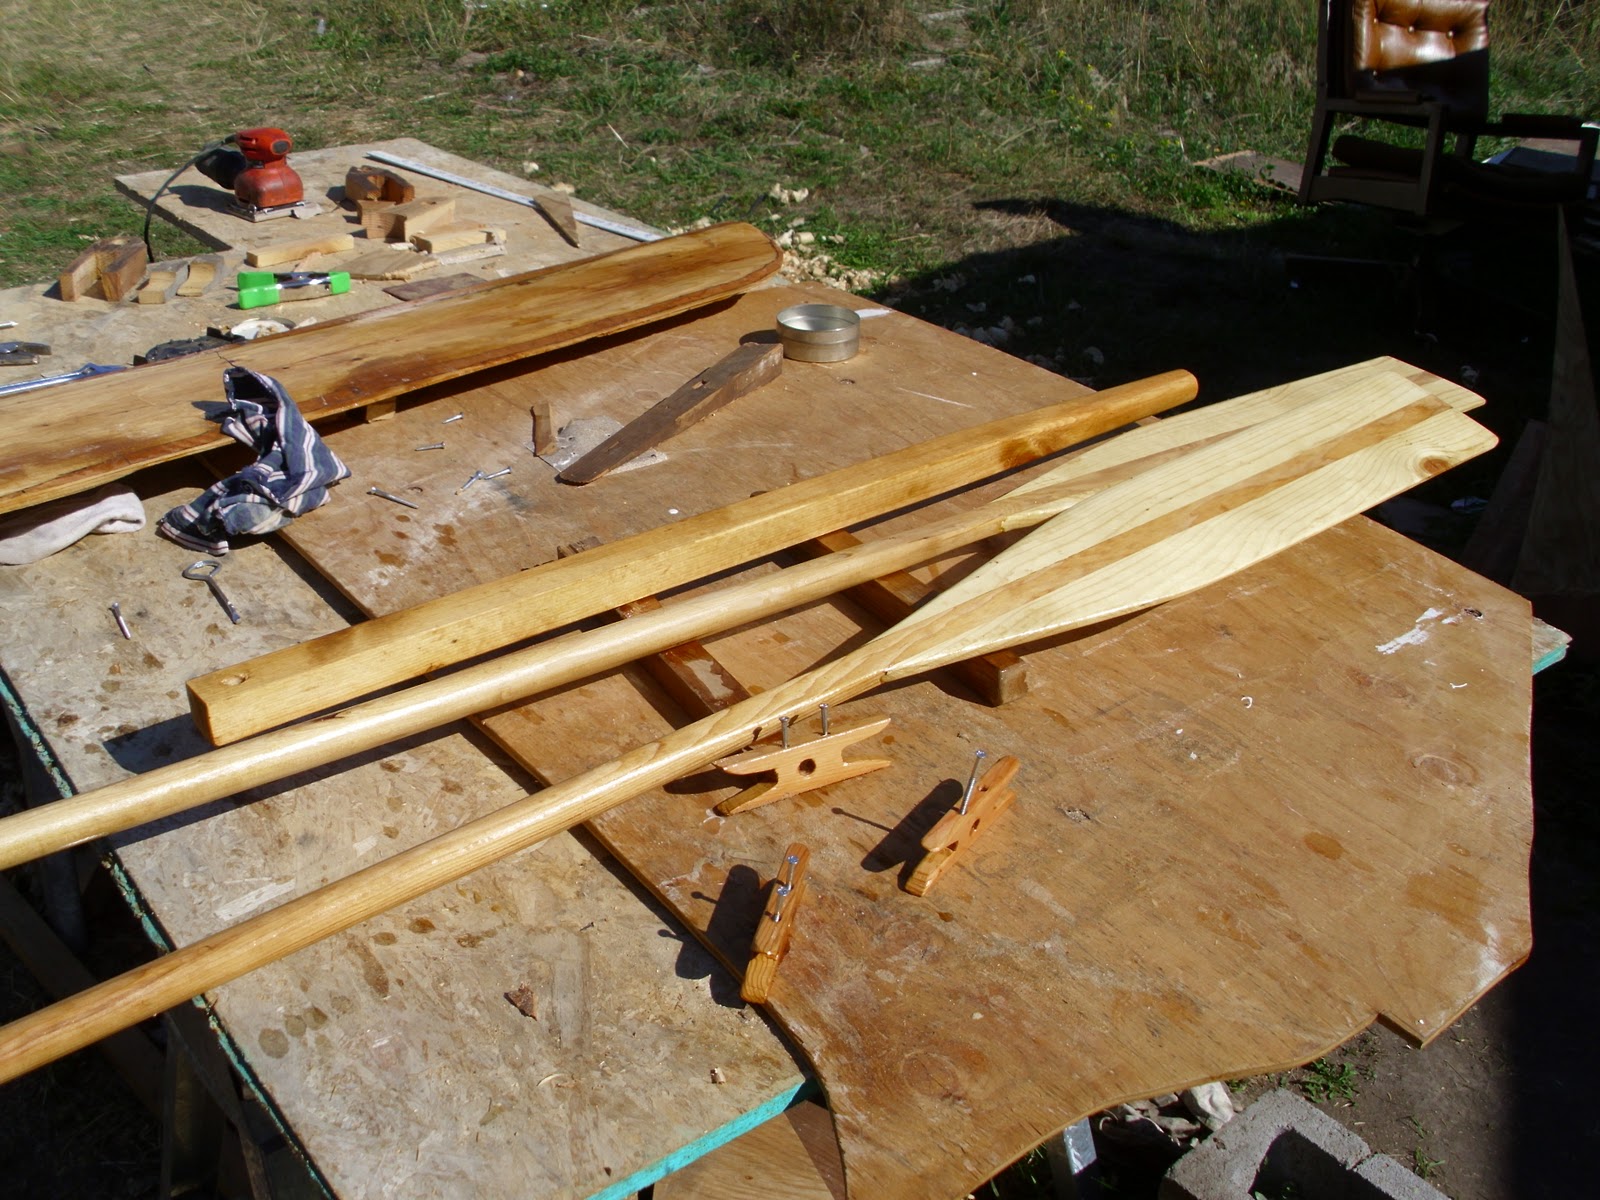
Well, if you don't have enough clamps...  improvise!  This is gluing the first blade to the oar handles.

So....it's going to be rather hard to take this boat anywhere if the wind dies-right?  Of course every proper boat needs oars and since I'm not rolling in cash to buy really pretty oars from the likes of Shaw and Tenney (warning pretty stuff at this link! http://www.shawandtenney.com/index.php ) so I guess I'll make my own.

There are a lot of ways to build an oar.  A lot of them require cutting the oar blank from solid lumber, which is great if you have a decent bandsaw and clear lumber to work with.  Well, this is a backyard boat and the sum total of heavy power tools used was the table saw for sawing out the gunwales and chines.  Another approach is needed.  Another route presented itself through Andrew Linn (note the Annas Discorse previously).  He has a page for building oars http://www.waderweb.com/plans/oars2/betteroars_0.htm  and you may like his route, or go some other, or just buy the fooled things.

Well, off to the lumberyard to get the parts.  The main oar is just closet rod--tough, pretty much clear of knots, and relatively lightweight.  The blade is supposed to be 1 x 2, but I (inadvertently) used 1 x 3.  The directions are pretty straight forward so it was a matter of cutting, planing flats on the rods (getting those in line with each other takes some care, but isn't hard). cutting the paddle blanks and gluing them on (Titebond II here-and don't skimp!).  Once the whole blank is glued up, the fun part starts.

Actually, you could take the blank and use it as an oar, but it'd look funny and be rather bulky in use, with a lot of extra weight on the end.  The suggestion is for the length of an oar to be twice the beam (at the gunwales) of your boat.  The beam of the Teal is about 42", so I went with 7 foot oars.  If that turns out too long, well I can always cut them down.

The fun is getting the paddle end to look like a paddle.  A lot of people have power planes.  How quaint.  Lacking yet another awesome power tool, I'll go dig out my big plane (Bailey #5) and have at it. 

If things go well for you, you'll wind up with something like this, and some sore arms from working the plane.  Thank gosh for power sanders at least.  This blade is made with 1x3's so might be a bit wider than others may suggest. 
There are certain tricks to using a hand plane on this sort of work.  The hardest part is planing at the upper portion of the blade, where it meets the handle.   Since the blade is not an even taper from the handle to the tip, you'll find you need to block up the upper portion of the blade to plane that area.  Rather hard to describe (ought I have made a video?) but it can be figured out.  One thing, when I started, I though commercial oars were a bit overpriced.  When I got done, James suggested I make him a set, but when he suggested a price, I thought that the commercial price really isn't that far out of line--and they have all that fancy power tools for the job!

This is more or less what you come up with.  Go nuts with the varnish and give it plenty of time to cure.   It will hold up better for you, but if you don't just sand and recoat.  Sharp eyed folks will see that knot on the one blade.  I was surprised that it didn't blow out while planing, but it hung in there.  Will talk later about the wooden cleats.


Monday, November 1, 2010

Sticky Wickets--or Fun with Epoxy!

Ok, back at it.  Of course I'm falling behind on my blogs, as will be really obvious with the next post.

Once I had bullied the hull together (well, it seemed that way with the chines......) I did a little informal test to see if I had any major problems with leaks.  This was another James idea that he tried with smaller boats and it seemed plausible to me.

So I filled the hull with water.   Not a lot mind you--actually only about 4 inches at the center, but enough to tell me where a leak might be an issue.   Well, it turned out to be an issue all over.  The bottom, being A-C plywood, was leaking like a sieve, with water dripping through all over, including I nice stream from the edge of the plywood sheet right at the middle.   Curiously the Luan had no problems, except for one nail hole.

At this point I had a choice:   I could epoxy and fiberglass just the chines and bow and stern, or I could glass that and the entire bottom.   The general consensus would have been to glass the bottom, but the hull weight is rapidly adding up and the eventual goal is for this to be cartoppable by one person.  Hmmm, what to do?

The most practical response from yelling out into the Internet was to epoxy the bottom and also to epoxy the interior and glass the chines and ends as usual.  I thought this a good strategy, and in hindsight probably saved me a lot of grief, as epoxy is a very tempermental critter.

Why is that?  Well, it's the darned pot life, and once it's gone, it's gone.  with the most interesting results.....

This was a one pint plastic container--a little smoke and heat and bingo, a hockey puck!  
 But I was working with a medium speed mix (Marine Epoxy from Duckworks) and working on very nice (80 degree) days--rather asking for trouble.   One recommended thing is to get the mixed epoxy into a shallow container (so it won't heat and self catalyze) and for gosh sakes--keep it out of the sun!

Still the results look good and with the sanding between coats and the glass on the chines as per Payson, I'm pretty happy with it.

Sunday, September 12, 2010

Bright and Brighter

Brightwork is pretty much just varnished woodwork.  Pretty stuff, but the varnish doesn't hold up quite as well as paint and so needs touch up work (sand and recoat) much more than paint.  Still, darned pretty stuff.  I've pretty  well decided that I will have some brightwork on the boat, namely on the gunwales and around the mast step.

Decided to tackle it sooner than later as the recent rains kept bringing out mildew on the gunwales and that just won't do.  So I tackled the matter.  Granted, it was just with a 1/2 pint of Ace Spar Varnish, but this isn't the most expensive boat out there, and I suspect the woodwork will be not be coddled--this is a cartopper after all.

So, after a lot of sanding to get off the mildew, spilled glue, and other defects, a wipe down to get the dust off and then a coat of varnish.  Well it makes all the difference, and will keep the wood clear of other hazards, including the errant paint drip or whatever else happens along.  No, not the most spectacular event of the build, but probably just as important.


Here one can see the gunwales in fresh varnish.  If it keeps the mildew away, all is well and good.

The Unsettled Details

Somewhere about now I really ought to have a name for the boat.  I mean all this effort and there's no appropriate name for it--heresy.  I suspect the traditionalist were wondering if I'd ever get around to it.  Well, I am.  In light of my background and interest in printing, especially with vintage letterpress and metal type; including having a Intertype (think the Apple version of a Linotype) it would make sense to reflect that.  So, the name of the boat is the Pica.  A pica, in printer's measure, is 12 points.  Six picas make and inc (actually a hair more).  Old timers with old typewriters will recognize Pica as the 10 characters to the inch measure that old typewriters worked at.   So, from hereon, we'll be talking about the Pica.
 
There are a few little problems that still hang around in the construction.  Some have been defeated, others have moved about and still present somewhat of a problem.  The first one was that nasty split in the chine caused by a knot turned the wrong way.  I first tried to fix the problem before the bottom was on with PL Premium, but the minute the clamps came off, the glue failed.  I revisited the issue in the hopes of getting the joint to settle down so that finish work could proceed.  I was finally able to resolve the issue through the funny Spanish windless method, though I'm not entirely sure.  However it did work.

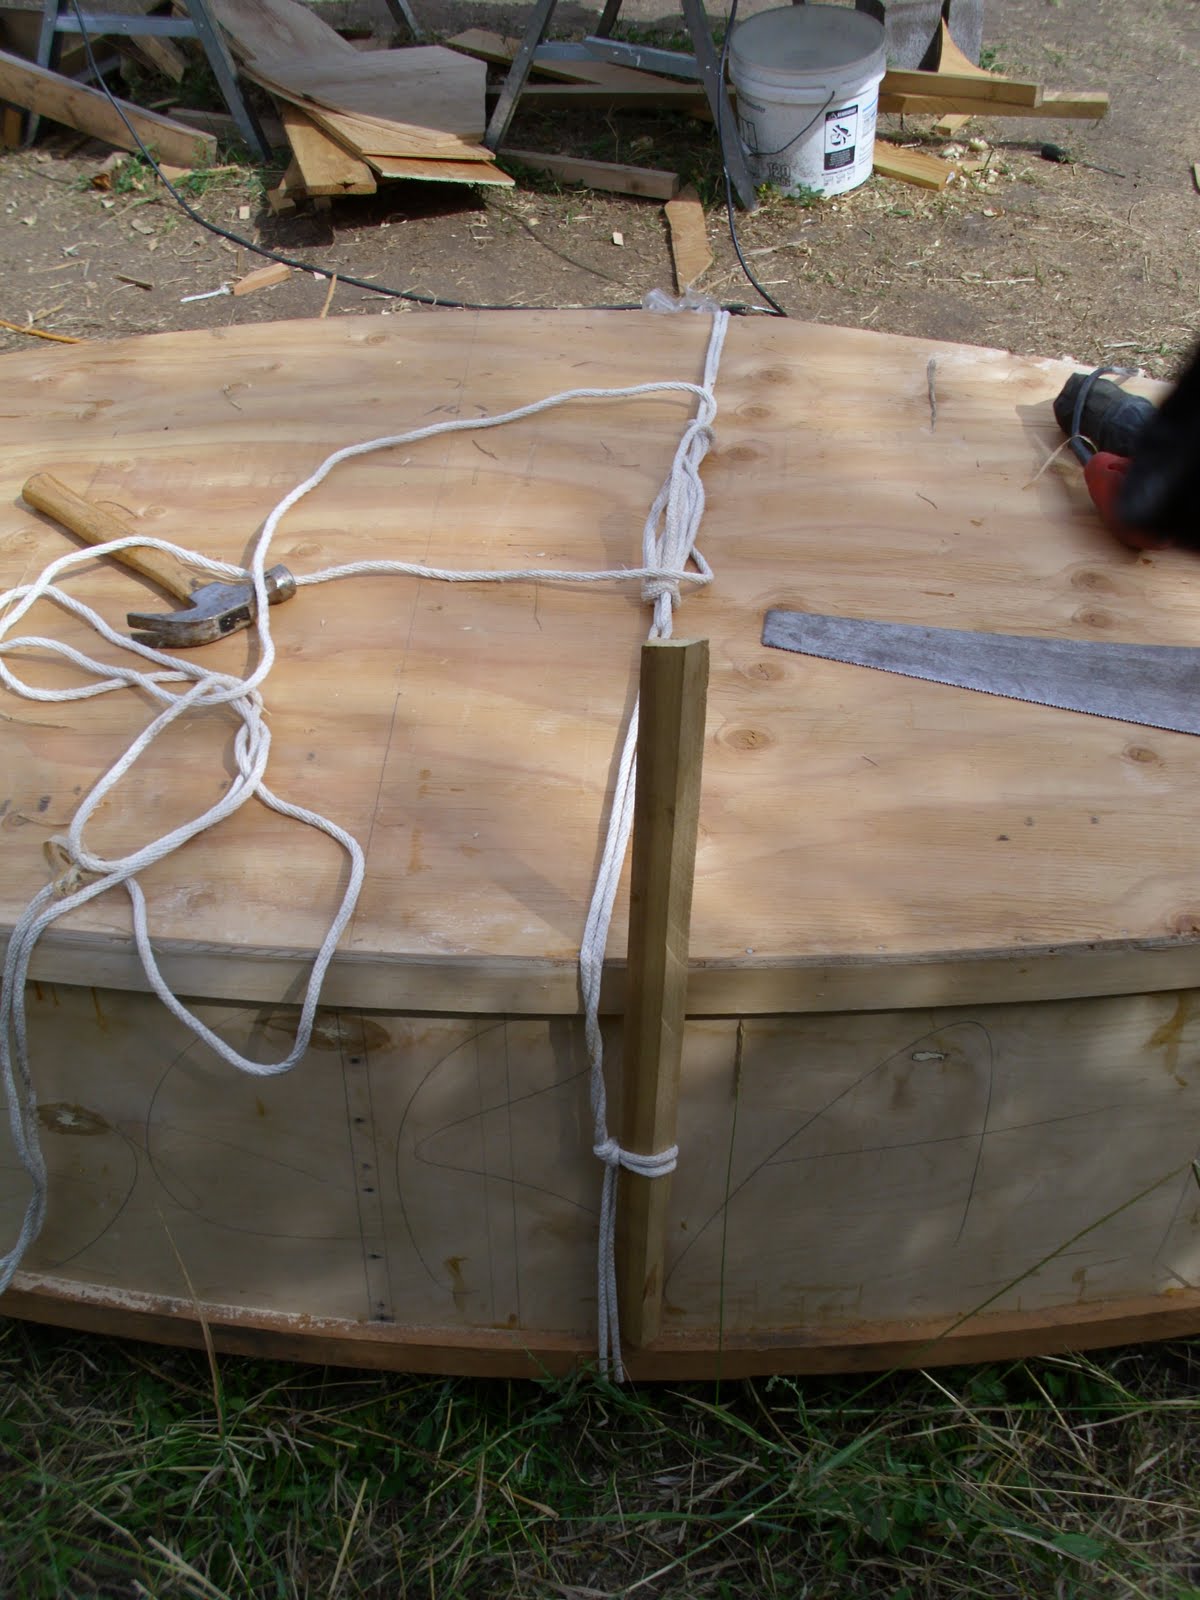
Here is the working side of the attempt to glue down the split.  The rope is bearing aginst a 1 x 2 which is pushing the split down.  This is being re-glued with Titebond II.  The plastic wrap is the keep the glue from sticking and it works really well, not only with Titebond, but also with PL Premium and probably epoxy even.

The working part of the windlass, Just wind 'er up.
 The glue joint held, it's been sanded down and hasn't acted up yet (even with a bunch of rain and damp).  However another problem won't go away, the chines at the stern were hard to pull together, and you might remember I had to pull it together with a bolt.  Well the gunwales are offering the same problem on one side, but more next time (blog has to catch up again).

Wednesday, September 8, 2010

Smoooooth

Well, after all the fun of getting the boat together comes the hard part--finish work.   All that surface needs some (or a lot) of attention to make it a decent surface for the paint and finish.   I suppose I could sail it as is, but that would be short lived economy.once the boat starts coming apart.

It seems that the about half the cost of a lot of boats is in the finish work (paint, varnish, fiberglass, etc).  I suppose one could also lose a lot in bells and whistles (fittings, etc) but still, a lot of attention needs to be placed on the finish, as that is the only thing that will protect your boat over the long haul--no paint=no boat.   


So, back to sanding.   The hull sides of this boat are 1/4" Luan, and at this point there is a reminder that it might be prudent to buck for beefier materials next time, as the Luan plywood is two rather wimpy laminations over one of decent thickness--really easy to sand through these outer layers--making getting off any of the glue drips a distinct challenge.   I guess that's why I annoy James by going after them all the time whether it's on my boat or not.   I'll be even pickier on the next build, down the road.

That white mark is not a good sign, as it means that the outer lamination has been sanded through, in an attempt to remove a glue drip (which I suspect is the unsandable PL Premium).  The only advantage of this is that the lamination is VERY thin.  Of course this area will be covered by epoxy and fiberglass, so this is not as terrible as it might appear.
I am not going to go for a mirror smooth finish as this boat is not going to be a showcase piece.  It will be nice, however and I intend for the finish to look good, so the worst of the bumps and lumps have to go, but in the end the boat needs to float and sail first--eye candy is a side benefit.   Never ending fun--and this is just the outside!

Wednesday, September 1, 2010

Raising the Mast


In our previous installment, I bored a lot of you to death with a windy essay on "plan drift".  You can wake up now.  Anyway a couple pix to detail what I did with the mast and how the stock installation should look.   First, where things stand pretty much right now.

 Well it looks spartan and in a fashion it is.  Since I didn't get the forward thwart to fit as tight as it ought, I will probably remake the part.  Also wound up splitting one of the upper rails.  Still it'll work for now.   That's is not the mast, just some lumber mocked up for a mass for checking vertical.
So, what's going on here?  The stock Teal design uses the thwart as the mast step and a small box with a square hole for the mast partner.  It's designed to go in one place and is meant for the stock sail rig, such as this:

This shows a pretty stock Teal, the handling of the mast step has been handled very nicely (though I notice that's not a spirit rig....).   This picture was liberated from http://www.duckworksmagazine.com/06/gatherings/scuzbums/index.htm  This is  Duckworks magazine blog, which is part of the rest of their site, and store  http://www.duckworksbbs.com/hardware.htm--which is where my epoxy, rope and glass are coming from, so I hope they don't mind this liberty.

The reason I built mine different was because I knew I was going to have decked bow and stern (those glued in frames).  I figured that the mast step rails could go forward and help secure a bowsprit (were I to go the jib route), so could be finished as brightwork, with room for stowing stuff below.  Since I had assembly issues with the first go round, the whole works (not the mast partner though) will be replaced with items of a better fit and finish (matching wood if going the brightwork route).  A couple blocks bridging the rails will retain the mast and partner.  Actually a more complicated than the original design, but now any rig could be hung on the boat (well pert near).  

Oh, and the mast too.  Getting back to the build, it started out as four 1 x 3's from Home Depot (who had 1 x 3s, for the person without the table saw).  Dig out the clamps and Titebond II and away we go.....  The mast is a three plank lamination that comes out to a 10' 8" mast.  The first two planks were held together with screws, but the third plank lamination had to be held with clamps and weights..It would be practical to do this part on a nice chunk of concrete or driveway, so as to avoid any bow in the finished product (I seem to have a 1/2" bend over the length of the mast
A few clamps and a lot of lead (I'm a letterpress printer with a Linotype, so finding weights is not a problem).
 So now I have a 2 1/4" stick.  Don't need all that wood, honestly, and who doesn't like a round mast?  So, a little creative cutting with the circular saw to rough off the corners and back to work with the hand plane--a couple hours later yields results.
If you look at the pencil, you can see the curvature--if all else fails, this will make one hell of a spar for somebody.
The finished product, though the top of the mast needs a finish trim.  The mast has an oval cross section, with the laminate layers running fore and aft.


So here it is, suppose it should be a bit more dashing at this point, but it's pretty boatlike so far.

, 

Before Raising the Mast

Remember plan drift?  It works by accident, and can happen by design. 

So why would a person steer away from a perfectly good plan offered up by a designer that will yield a perfectly usable boat?   I mean, it would seem that by now there ought to be a boat for every conceivable taste and desire, from racing to puddle jumping.   I mean, it's as easy as jumping on the Internet and looking, right?

Well, finding a boat design on the Internet is kind of like buying a car, unseen, off of Ebay--especially if it's a model you've never owned before.    Now, how did I even pick a Teal?  Well the original idea was to build a Harley 8 (think cheap sailing experience).  My friend James said that, "No, you won't be happy with that".   Now, of course during his build of his Harley 8, the Teal kept popping up as a "neat" boat.  Still James wanted something bigger (he's going to build Michalak's Mayfly 14) because he wants to carry two people in the boat.   The Teal looked really appealing, and before l knew it, here I am.   Not building a cheap boat either; phooey!

Now, is the Teal THE boat for me?  Well, probably not, but since this whole exercise was not born of my "wanting" a boat, it's more a matter of grabbing the most available plan vessel and going for it.   But, that is NOT recommended if you're WANTING a boat.

So, back to the mast.   Why on earth would I not follow Bolger/Payson's perfectly sensible spirit rig?   I honestly can't say, but the spirit rig didn't look too user friendly and lacked one vital element that somebody else suggested I have--the ability to reef the sail or otherwise depower the rig (short of dropping sail and rowing).   Also, a 16 (ok, 15'8" and some) foot mast?  Egad, that's a lot of mast way up there or on top of my car.  Still, it fits the Bolger imperative in many of his "instant" boats of "simple, simple, simple", as in instant, not espresso.

Since I am effectively a newbie, I also didn't want to have too much sail and the attendant hazard of dumping the boat and then trying to recover it.   However, in the future, I might.   That's the point where they say you should build another boat, but why not make the current boat more flexible so I can change things about?  The most changeable thing on a sailboat is the sail rig, and changing that moves the sail's center of effort, which either means moving the leeboard/daggerboard, or moving the mast.   Well, easier to build a multi-position mast step than a multi-position leeboard, which would be a lot easier than a multi-position daggerboard or centerboard (though it's probably been done).

Well that's my story and I sticking to it.  The initial sail rig will be a balanced lug.   It's also a simple rig, though probably not a as simple as a spirit, since the lug requires some extra setup and tensioning to work right.  However it runs on a lot shorter mast and is a lot simpler to cut out (yes, the good ol' blue poly tarp special).
Eventually I might try the gaff with jib that the Annas Discorse has, simply because it looks a lot more "boaty", but it may be a poorer performer.  Might not even get that far, but I will get this boat built--otherwise I'd have an interesting half built thing in the backyard.  Besides, I've already ordered the epoxy (ouch!) and it's on it's way as I write.

Next time I'll put up pictures of what I did (on the mast step) and let others rate my wisdom on that.  Still, it's my boat and if it all comes out wrong (or right) it's going to be my problem or success.  Your mileage will certainly vary.

Sunday, August 29, 2010

Fiddly Bits

One thing I have found is that boats do not come with square corners.  Well, I suppose if I built a barge or a box boat, such as a PD Racer, I might find some square corners, but a double ended sharpie like the Teal comes with virtually none.

With that means cutting lots of odd shaped pieces, including some that are all odd angles, such as the blocks for holding the thwart that would normally serve as the entire mast step.  Mine's a little different, but still needs someething to mount to the hull.  To that effect I wound up making two blocks with no right angles.  I was at least able to use some old chine stock that James had leftover, but even the angle on the top of it had to be adjusted to suit--this on a 4" long piece of wood and no vise handy.   Enter the solution (see picture) but don't try this at home!

Sometimes you just need a little dab to do ya.  Using a plane like an old style box grater was what worked in this case--but watch your fingers!
All that fuss for what?   Well here's the part in action--note the thwart sits a little forward, but this thwart and mast step are sort of placeholders and will (eventually, if not sooner) replaced.


  I suppose one other neat tool to have for this sort of work is a chop saw that can cut compound angles--well if this was a trade, you betcha.  May as well toss in a shaper, edger, planer, sander and ..........  the list is endless.  Still, if you want to, go nuts.

Friday, August 27, 2010

Bottoms Up!

Well, with all this fiddling, you think I would put the bottom on this and get a move on.  Okay, hint taken.

Sawing out the bottom went fairly quick, though the final result came out roughly a 1/4" oversize overall.  That's not too bad, as that beats coming in under size.  I did have to wait a day to try to bind in a split in the chine (keep the knots facing in--the only knot and bang, the only split.......   I tried to put PL Premium (think an extra thick version of Gorilla Glue) into the cracked piece, cover with plastic wrap, and then clamp down with a piece of luan.  Well when I pulled the clamps, the joint lasted a whole five seconds before springing open again.  Probably should have used Titebond II.

Yeah, I thought I had this crack beat with PL Premium--5  SPROING!  Keep those knots on the inside folks. 


Well, since the split's going to be a pain, may as well put the bottom on.  Must note that this boat is gifted with "plan drift".  If you'll note, we had that bit of bother when we cut one of the sides in identical fashion.  This was resolved by cutting off the offending ends of the sides and putting longer butt plates on.  Okay, that's not bad, but what about those temporary frames than were glued in, and sank flush to the bottom of the sides......   Ahhh, that's a bit more interesting problem.

Turns out the 8 foot center portion comes within an inch of each of those frames, and of course there is no room for a traditional butt plate (as spec'd in the plans) to fit.   Gee, an inch?   Well I did have plenty of 1x2 stock and since  frames almost come down flush with the sides, what about just attaching the 1 x 2 to the frame and use that as a butt plate???  Well why not.   The items were cut and fitted (more on this), glued and screwed on and then allowed to cure a little bit.   When things were set up to my satisfaction, James (who was over since he wound up taking some glue home with him) helped me fit the bottom, starting with the bow portion.
This gives an idea of what the bottom butt plate came out to.  It is glued and screwed to the bulkhead and the bottom sheets are nailed to that (bedded in PL Premium).  Also shows to better effect the off balance cut of the side butt plates.  Oh well.

All sheets were laid on large beads of PL Premium and then nailed down with 1 inch nails.   What! no bronze nails?   Well, in the time period of building this boat, getting bronze nails (which won't rust if exposed to moisture) were a mail order item and the boat had progressed a long ways without bronze nails--so onward.  However, if I build another craft, I will go through the bother of ordering bronze nails for joinery, and copper nails for any clinched nail work (such as putting on butt plates).

We got the bottom on in very quick order (the advantage of working with two people).   Of course with the bottom laid down, without mishap, it was time to let the glue dry.   This gave the opportunity to pore over sail plans, as this will directly affect how we deal with the next major part of the boat--the mast!

Is that all the faster you can go?

    Well, the last installment didn't really note any progress, but both gunwales were mounted, the fir used is wonderful wood and gave no fuss or muss during installation.  Now I need to progress to putting the bottom on.   I was somewhat concerned that my hull had suffered "plan drift" but when I measured the beam against the plans, I was within a 1/2 inch (over).   This qualifies as a good thing.

     However, not all clear sailing....   The temporary frames, which were cut from plywood, were not meant to bottom against the bottom of the side sheets.  In assembly, that is what mine did.    Now it might be that the frames were cut wrong, more measurement might be necessary.   The reason this is a problem is because the butt plates for the bottom are in roughly the same position as the frames.  A solution is being engineered, much to the chuckling (or just plain annoyance) of boat designers Bolger/Payson.

Monday, August 23, 2010

Beyond the Hiatus

  The danger of building a boat, or any other project that is longer than a day, is that things crop up that distract one from getting the job done.  In my case, it was working on a steam boiler to accumulate operating hours required in Montana to have one's own traction (which can include railroads, cranes, or tractors) license.  Now of course I'm supposed to be chasing those hours down and now that's not getting done.   However, I'd sooner just blame the Internet as the grand folly of time-wasting.    Now, enough of that.

   In our last installment (yes, boat building as a soap opera--or serial thriller?) I have just secured the chines and bemoaned the world of short wood.  Oh what to do?   Well I needed 16 foot pieces to make up the gunwales, so went out and found a really beautiful  chunk of 1 x 4 fir--absolutely clear stuff and actually cheaper than what all I bought at Home Depot.  Of course it's a 1 x 4, and I need 1 x 2s and the lumber yard didn't have a table saw.   This isn't going well.

    Or can be considered an elementary lesson in boat building.....get a table saw (preferably one than can cut a miter.   Also wouldn't hurt to have some roller stands to help manage your lumber as you cut it.   So, what to do?    Well, James mentioned he has a very friendly neighbor (whom I`ll thank profusely) who would lend him said saw.   Okay, put the plank on the roof and away we go (the plank handling so much better than the luan....).   We got my board cut in 1/2 and James got his chine for his One Sheet Skiff in the same session.  The neighbor got his shop floor swept and things dug out from behind the saw that he may not have seen in a while.   Everybody wins!

     Now, those boards didn't come out precisely in 1/2, so my 1 x 2s were not a match.  Well, let's bring out my favorite tool for boat building (well within my very limited experience.
Just an old Stanley plane, but just about a perfect size for putting the proper angle on the chines.

   My chines were just plain 1 x 2, but in the beginning I knew I wanted to plane them down to the flat of the bottom, rather than taking my chances (of getting it wrong) with a table saw.   This is what happened with James' One Sheet Skiff.   It had migrated to my yard because build variations turned it into a 1.1  sheet skiff and he didn't have quite enough wood.   Remember that bum sheet of luan?  Sharing materials and tools can expedite work on all boats all around.   His boat actually went home today, after getting gunwales and the hull bottom fitted.   I guess that means he's getting ahead.....

Looks like a boat yard....   James Maxwell's S/V Sea Hawk is on the bench, mine is in the background on the ground.

Friday, August 6, 2010

The Seductive Annas Discors

   The Teal is considered a very attractive small sailboat.  It can be built in a variety of different ways, though generally it is an open cockpit, including in front of the mast.  It can be built plain, or it can be souped up, well in fit and appearance, to be so much more than a boat to mess about in.

   Enter the Annas Discourse:   Andrew Linn, a fine boat builder, built a basic Teal hull, then passed the hull onto his friend Pat Pattson, who created an absolutely (to me) beautiful craft.  It has some elements (coamed and closed in cockpit) that would not lend themselves to a car topper (which mine will be) but the little bits and details make this craft stand out, or at least make me say "I want one!"
Andrew Linn with the Annas Discorse.  Sharp eyed readers can pick out the variants from the Teal design, but on the whole, that's what she is.

A look inside the cabin shows a daggerboard housing (no fiddling with lee boards) and the bow air box/storage.  You can also see the decking/coaming, which appears to be 1/4" plywood. 
    Now, who wouldn't want a boat like that?  Come on, I dare you.

    I think the key to a boat like this, isn't to build a copy of it, but to see what the results are of fiddling with the fit and finish of a craft.  I remarked to James once that it seemed like some of the boats that were at the Homebuilt Boat Show at the Seattle Center for the Wooden Boat http://www.cwb.org/cwb-seattle  were more exercises in craftsmanship than efforts to build boats.  However, I think now I see the point of that, as what is put into a boat in the build phase is a visible declaration of your skills, whether you keep the boat or give it away.

 
The rudder looks pretty much like a run of the mill pop-up rudder with a bungee cord hold down.  Note the cut off stern, which looks to simplify rudder mounting.  This boat has a push/pull tiller.

    So, while some may see the Annas Discorse as overworked Teal, and the Teal an under worked whatever (the Teal declaimed by those who want to carry a large crew or go really fast, I guess) I think it's much better than that.  On some boards, the Teal is poo pooed, but I consider it a valid craft and one reasonably well suited for single man sailing.  I suppose I might have the urge to have more folks in my boat, but honestly, I think I will be enjoying sailing as a solitary endeavor---not a party.


   Andrew Linn has a really neat website, which really showcases the various things he's built (and no, I probably won't come close to emulating him).  Still the page that shows off the rest of the appointments of his and Pat's work is here http://www.andrewlinn.com/080807_teal/annas_14.htm .

A Royal pain in the Chine

     Sort of bogged down.  Getting the chine logs (which provide for mechanical connection between the side and floor of the hull) warped to fit at the bottom the hull is, well, not fun.   Here is where haste to get materials will backfire.  The Teal is a 12 foot boat, but the chines and gunwale (top chord rails to us landlubbers) are going to be far longer than that.  When poking about Home Depot, I wound up getting 14 foot stock, which was barely adequate for the chines, but too darned short for the gunwales.  Well, I tried with miserable results to scarf and additional bit onto the gunwales, but the first attempt did not pan out.   I have found another source, but it would have been better to develop a Bill of Materials before I got started.

     Also found what an utter joy (did I say joy, I'm sorry, that's not the word) of pulling the chine up to the stem and trying to hold it there to run a screw in.  The book says to use a Spanish windlass, but the pieces don't more very well, and there is a slight other issue getting in the way.  Hmmmm?  Well, I varied from the plans (oh, old timers, quit snickering) as I wanted the chines to be more than just cut off on the end, you know, something rounded or such.    Fine, but you have to cut the end off first and then lose your handle (if your Spanish windlass doesn't work) to have a helper reef the chine over.

One little departure from plans can create much more fun than desired.  In this case I wanted the chines and gunwales to come together at the front, either as a point or a rounded point.   That is a very hard compound curve to cut out, and I failed miserably (both times).  I can always go back and fill the slot, or do what's in the original build and  cut them off square at the end of the hull.


This is the stern end.  You'll notice I had no fun pulling the chines over to the stem and getting them to stay put.  When you secure this, use a LONG screw, as you need to secure into the stem or the chine will just tear the luan right off the stem and you will not be happy.  The bolt through the end will substitute for the non-existent Spanish Windlass as I will drown the joint in Titebond II and then draw up the bolt, and then leave the mess for a few days and hope it sets up tight.  We'll see.


     In retrospect, I can think of a couple solutions to this issue, but of course I didn't think of those at the time, so I got a good pile of stuff from the cussword box and let at it.   No, that doesn't yield better results but.......